If your nonprofit uses Google Ads as part of its marketing efforts, remarketing should be part of your strategy. In this post, we’ll teach you how to set up a remarketing campaign.
If you’re new to Google Ads or don’t work with it very often, you may be wondering what remarketing is and what it entails. So before we get to how to set a campaign up, let’s go over what remarketing is.

What is a Remarketing Campaign?
A remarketing campaign is a highly effective way to target people that have shown interest in your nonprofit. When a visitor to your website leaves, a remarketing campaign shows them ads for your nonprofit on other websites. Since they have already visited your site and expressed interest in your organization, they are more likely to be engaged with your ads, increasing your ROAS (return on ad spend) and conversions.
How does Google know they’ve visited your website? The answer is… cookies! If you aren’t a web developer, and have no idea what a cookie is, you’re not alone. Don’t worry about it. All you need to do is install a simple tracking tag on your website that tags your website visitors so Google can re-target them with ads later.
Setting up a remarketing campaign can be tricky if you aren’t familiar with Google Ads, which is why we’ve put together this guide to setting up a remarketing campaign.
How to Set Up a Google Display Remarketing Campaign
The first step in setting up your remarketing campaign is adding a remarketing tag to your website. This tag allows Google to keep track of who has visited your website so they can be shown remarketing ads. To add the remarketing tag:
- Log into your Google Ads account.
- Click the wrench icon in the upper right-hand side of the screen and then click “Audience Manager.”
- Click on “Audience sources” on the left and select the AdWords tag.
- Copy this tag and paste it between <head></head> tags of every page of your website.
Now you’re ready to create audiences in Google Ads. Your audiences are the group(s) of people you want to re-engage with your remarketing campaign. Once you’ve installed your tag, it may take a few days for audiences to populate so don’t panic if there is no data there immediately.
To create your remarketing list/audience:
- Click the wrench icon in the upper right-hand corner of Ads, then click “Audience Manager.”
- Click the blue plus sign on the left and select “Website Visitors.
- Name your audience (see below.)
- Specify the visitors you want to add to your remarketing audience (you don’t need to create an audience for “all visitors.” Google Ads automatically creates this for you.)
- Repeat this for as many audiences as you would like to re-engage.
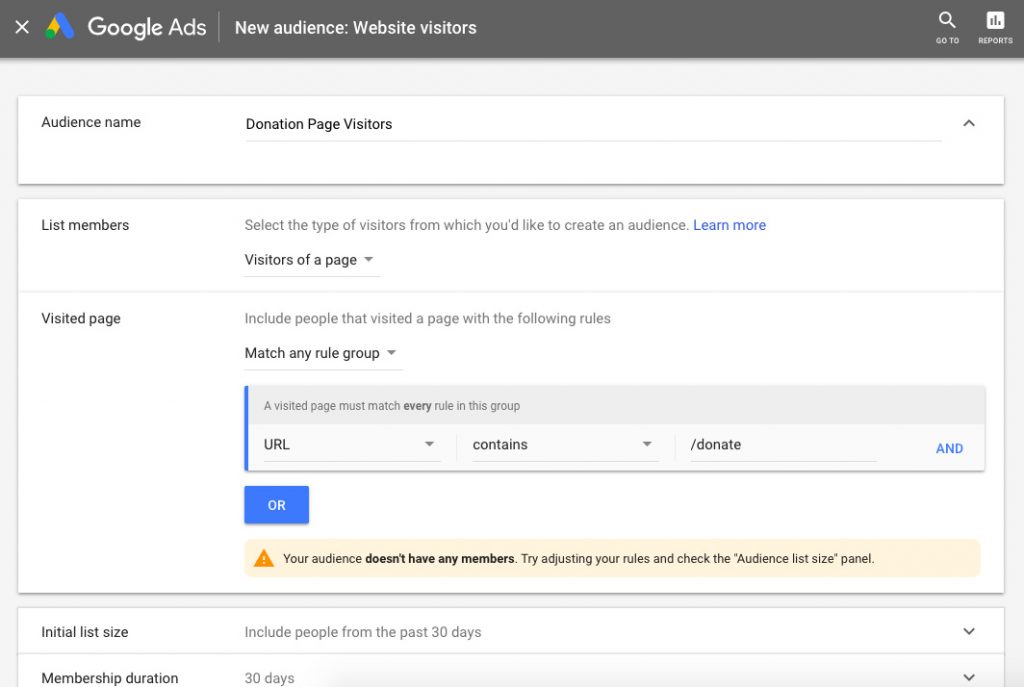
An example of a new audience:
Now that you have the remarketing tag on your website and some defined audiences, you’re ready to create ads for this campaign. Here is how to create ads for a remarketing campaign:
- From the Google Ads dashboard, click “Campaigns” in the menu on the left.
- Click the blue plus sign and then choose “Leads” as your goal.
- For the campaign type, select “Display – Run different kinds of ads across the web” with the the subtype “Standard display campaign.” Click “continue” at the bottom of the screen. (Don’t put in your website at the bottom.)
- On the next screen, name your campaign and choose the locations and language you want to target.
- In the “Bidding” section, make “Conversions” your focus and “Manually set bids” as the way you want to get conversions.
- Choose a daily budget for your remarketing campaign. It’s wise to start with a lower budget and increase it over time when you have a better feel for how your ads are performing. Calculate your daily budget by dividing your monthly budget by the number of days in the month.
- Choose a name for your first ad group.
- In the audiences section, choose “How they have interacted with your business (Remarketing and similar audiences) and pick the remarketing audience you want to target.
- In the automated targeting section, be sure to select “No automated targeting” so Google Ads won’t target people outside of your remarketing audience.
- Choose a cost per click bid for your remarketing campaign. It’s a good idea to start with a bid between $0.50-$1.00.
- Finally, click on “New Ad” to create ads for your ad group. (You can skip this and come back later if you want to.) You can upload images for display ads or copy ads you’re already using.
- When you’re done, click “Create Campaign.”
That’s it! You’ve set up your first Google remarketing campaign. With targeted ads, you should see an increase in conversions since you know the people seeing your ads are already interested in your organization.
Manage Your Donations More Efficiently
At Capital Business Solutions, we help nonprofits improve their accounting processes and save time and money. With our nonprofit fund accounting and financial management software, you will be able to better handle your nonprofit’s donations and finances. To learn more, contact us at (888) 249-6008 or fill out our online contact form!